Creating a Horizontal Scrollable Calendar in Jetpack Compose
As I was working on CookBook‘s meal planner, a cool challenge popped up: I needed a calendar that scrolls horizontally to schedule meals. Each date had a dot for scheduled meals, and it only showed 3 months before and after (you can change this). But here’s the twist: the regular solutions didn’t fit well with CookBook‘s style. They were mostly for XML layouts and a bit of a mess.
I decided to come up with my own solution. It might not be perfect, but it got the job done for what I needed. I’m sharing how I did it, so if you’re in a similar situation, you can tag along and learn from it.
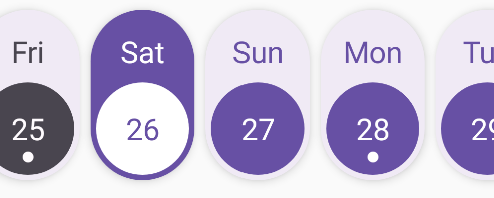 Final Component
In my app, meal scheduling is a key feature. To achieve this, I’m creating a data class called CalendarSchedule. It neatly connects specific dates with lists of meals:
data class CalendarSchedule(
    val date: LocalDate,
    var meals: List<Meal>
) {
    fun isScheduled() = meals.isNotEmpty()
}
This data class will be the foundation for our scheduling system, helping us link meals to dates in a structured way.
Now, let’s consider our list of CalendarSchedule instances. Each object in the list represents a scheduled date with an attached list of meals. Notably, these dates may not always be continuous. The challenge lies in aligning these dates within the 3 months prior and 3 months ahead range.
To tackle this, I’ve designed a function called getDates. This function takes a list of CalendarSchedule items as input, along with adjustable parameters pastMonths and nextMonths (defaulting to 3 for now). It returns a pair: an integer and an array list of CalendarSchedule instances.
fun getDates(
    calendarScheduleWithMealsList: List<CalendarSchedule>,
    pastMonths: Int = 3,
    nextMonths: Int = 3
): Pair<Int, ArrayList<CalendarSchedule>> {
    // Implementation
}
Let’s implement the function. We’ll start by creating an empty ArrayList of CalendarSchedule. This will serve as our canvas to gradually insert the scheduled dates, effectively bridging any gaps with empty schedules.
val scheduledDates: ArrayList<CalendarSchedule> = arrayListOf()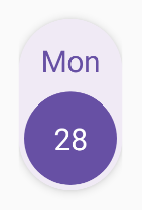 Calender Item
Moving ahead, let’s define some variables. We’ll start with date, representing the present day. Then there’s nextDate, which will help us navigate forward in time. By adding the nextMonths parameter, we can move to the upcoming dates.
Additionally, we’ll introduce currentDate, which initially aligns with date. However, by subtracting the pastMonths parameter, we’re able to shift it to earlier dates. This currentDate acts as a guide, gradually filling the temporal gap as we increment it.
var date = LocalDate.now()

var nextDate = date
nextDate = nextDate.plusMonths(nextMonths.toLong())

var currentDate = date
currentDate = currentDate.minusMonths(pastMonths.toLong())
Now, let’s bridge that gap. We’ll use a while loop that continues as long as currentDate is earlier than or equal to nextDate. This loop effectively fills the time span from 3 months before to 3 months after. For each date within this range, we’ll perform a check.
If the calendarScheduleWithMealsList contains the current date, we add the corresponding CalendarSchedule entity to our list. Otherwise, we create a new CalendarSchedule instance with an empty meal list and add that to the list. The variable index keeps track of the current date’s index, providing an efficient way to calculate it.
var index = 0
while (currentDate.isBefore(nextDate) || currentDate.isEqual(nextDate)) {
    val result = calendarScheduleWithMealsList.filter { currentDate.isEqual(it.date) }
    if (result.isNotEmpty()) {
        scheduledDates.add(result[0])
    } else {
        scheduledDates.add(
            CalendarSchedule(
                currentDate,
                emptyList()
            )
        )
    }
    if (date.isBefore(currentDate)) {
        index++
    }
    currentDate = currentDate.plusDays(1)
}
Complete Implementation of the getDates Function
fun getDates(
    calendarScheduleWithMealsList: List<CalendarSchedule>,
    pastMonths: Int = 3,
    nextMonths: Int = 3
): Pair<Int, ArrayList<CalendarSchedule>> {
    val scheduledDates: ArrayList<CalendarSchedule> = arrayListOf()

    var date = LocalDate.now()

    var nextDate = date
    nextDate = nextDate.plusMonths(nextMonths.toLong())

    var currentDate = date
    currentDate = currentDate.minusMonths(pastMonths.toLong())

    var index = 0
    while (currentDate.isBefore(nextDate) || currentDate.isEqual(nextDate)) {
        val result = calendarScheduleWithMealsList.filter { currentDate.isEqual(it.date) }
        if (result.isNotEmpty()) {
            scheduledDates.add(result[0])
        } else {
            scheduledDates.add(
                CalendarSchedule(
                    currentDate,
                    emptyList()
                )
            )
        }
        if (date.isBefore(currentDate)) {
            index++
        }
        currentDate = currentDate.plusDays(1)
    }
    return index to scheduledDates
}
Creating the Calendar Item Component
Let’s proceed with the actual component creation. We’ll begin by crafting the element that represents each date. This component takes in a single calendarSchedule object, along with the currently selected date and a lambda function to trigger when the date is clicked.
Within the component, there’s a selected variable that tracks whether the calendarSchedule corresponds to the current date. With this foundation, we embark on making minor tweaks to the provided data. These modifications, while dependent on your familiarity with Jetpack Compose, involve adjustments to colors and the visibility of dots if the meal list is empty. I won’t delve into every detail here, but the code takes care of these nuances.
@Composable
fun CalendarItem(
    calendarSchedule: CalendarSchedule,
    selectedDate: LocalDate,
    onDateClick: (CalendarSchedule) -> Unit
) {
    val selected: Boolean = calendarSchedule.date == selectedDate
    ElevatedCard(
        shape = RoundedCornerShape(percent = 50),
        elevation = CardDefaults.cardElevation(5.dp),
        colors = CardDefaults.elevatedCardColors(containerColor = if (selected) MaterialTheme.colorScheme.primary else MaterialTheme.colorScheme.surface)
    ) {
        ConstraintLayout(
            modifier = Modifier.clickable {
                onDateClick.invoke(calendarSchedule)
            }
        ) {
            val (dateLayout, scheduleLayout, backgroundLayout, dateText) = createRefs()
            val past: Boolean = calendarSchedule.date < LocalDate.now()
            Text(
                text = DateTimeFormatter.ofPattern("EEE").format(calendarSchedule.date),
                color = if (selected) MaterialTheme.colorScheme.onPrimary else if (past) MaterialTheme.colorScheme.onSurfaceVariant else MaterialTheme.colorScheme.primary,
                modifier = Modifier.constrainAs(dateText) {
                    top.linkTo(parent.top, 16.dp)
                    start.linkTo(backgroundLayout.start)
                    end.linkTo(backgroundLayout.end)
                },
                style = Typography.titleLarge
            )
            Box(
                modifier = Modifier
                    .size(68.dp)
                    .clip(CircleShape)
                    .constrainAs(backgroundLayout) {
                        top.linkTo(dateText.bottom, 8.dp)
                        start.linkTo(parent.start, 4.dp)
                        bottom.linkTo(parent.bottom, 4.dp)
                        end.linkTo(parent.end, 4.dp)
                    }
                    .background(if (selected) MaterialTheme.colorScheme.onPrimary else if (past) MaterialTheme.colorScheme.onSurfaceVariant else MaterialTheme.colorScheme.primary)
            )
            Text(
                text = calendarSchedule.date.dayOfMonth.toString(),
                color = if (selected) MaterialTheme.colorScheme.primary else if (past) MaterialTheme.colorScheme.surface else MaterialTheme.colorScheme.onPrimary,
                style = Typography.titleLarge,
                modifier = Modifier.constrainAs(dateLayout) {
                    top.linkTo(backgroundLayout.top)
                    start.linkTo(backgroundLayout.start)
                    end.linkTo(backgroundLayout.end)
                    bottom.linkTo(backgroundLayout.bottom)
                }
            )
            if (calendarSchedule.isScheduled())
                Box(
                    modifier = Modifier
                        .clip(CircleShape)
                        .size(8.dp)
                        .background(if (selected) MaterialTheme.colorScheme.primary else if (past) MaterialTheme.colorScheme.surface else MaterialTheme.colorScheme.onPrimary)
                        .constrainAs(scheduleLayout) {
                            start.linkTo(backgroundLayout.start)
                            end.linkTo(backgroundLayout.end)
                            top.linkTo(dateLayout.bottom, 2.dp)
                        }
                )
        }
    }
}
Calendar Item
Moving ahead, we’re ready to assemble the final piece of our calendar puzzle. Introducing the Calendar component, which receives a list of calendarSchedules, the initial position (representing the initially selected date), customizable contentPadding, and a lambda function to propagate actions.
At its core, this component leverages a variable to store the selected date, initialized with the current date. Employing LaunchedEffect, we ensure the component automatically scrolls to the current date. To achieve this, we capitalize on LazyRow, our tool of choice for displaying the dates.
Here’s the Calendar component:
@Composable
fun Calendar(
    calendarSchedules: List<CalendarSchedule>,
    initialPosition: Int,
    contentPadding: PaddingValues = PaddingValues(),
    onDateClick: (CalendarSchedule) -> Unit
) {
    val selectedDate = rememberSaveable { mutableStateOf(LocalDate.now()) }
    val listState = rememberLazyListState()
    if (initialPosition != -1)
        LaunchedEffect(Unit) {
            listState.scrollToItem(initialPosition)
        }
    LazyRow(
        state = listState,
        horizontalArrangement = Arrangement.spacedBy(8.dp),
        contentPadding = contentPadding
    ) {
        items(calendarSchedules) { calendarSchedule ->
            CalendarItem(calendarSchedule, selectedDate.value) { calendarScheduleSelected ->
                selectedDate.value = calendarScheduleSelected.date
                onDateClick.invoke(calendarScheduleSelected)
            }
        }
    }
}
Putting it All Together
To put this into action, start by fetching the scheduled dates from your database or the storage location you’ve utilized. Use the getDates function to meticulously fill in the gaps. This function not only bridges the gaps but also conveniently returns an index mapped to the schedule.
Now, with your data primed and ready, simply invoke the Calendar component on your screen. Pass the data acquired from getDates to the component. Notably, the index you’ve obtained acts as the initial position for a smooth starting point.
Here’s how it comes together:
val result = getDates(list, 3, 3)

Calendar(
    calendarSchedules = result.second,
    initialPosition = result.first,
    onDateClick = { clickedSchedule ->
        // Actions to perform when a date is clicked
    }
)
Let’s wrap up here. Until our paths cross again, keep the momentum going. Take care and see you next time! Cheers!